

Snowman sugar cookies with simple cookie icing, no piping experience needed. Make them as gifts or add them to your holiday cookie tray!

How cute are these snowman cookies with their sparkly scarves? They're the cut out cousins of my melted snowman cookies, and just as easy.
I kept them as simple as possible so even if you're not great at piping, these are going to be a breeze! I'm going to show you exactly how to decorate them in step by step instructions and a video. Let's get started.
These snowman cookies are made with my favorite sugar cookie dough and decorated with an easy cookie icing. Both recipes are in the card at the bottom of this post, or you can use your own favorites. If you want to try a flavored dough, I also have a cookies and cream flavored cut out cookie!
What You Need for Snowman Cookies
- Rolled Sugar Cookie Dough Recipe
- Cookies and Cream Sugar Cookie Dough Recipe (If you want a flavored dough)
- Easy Cookie Icing Recipe
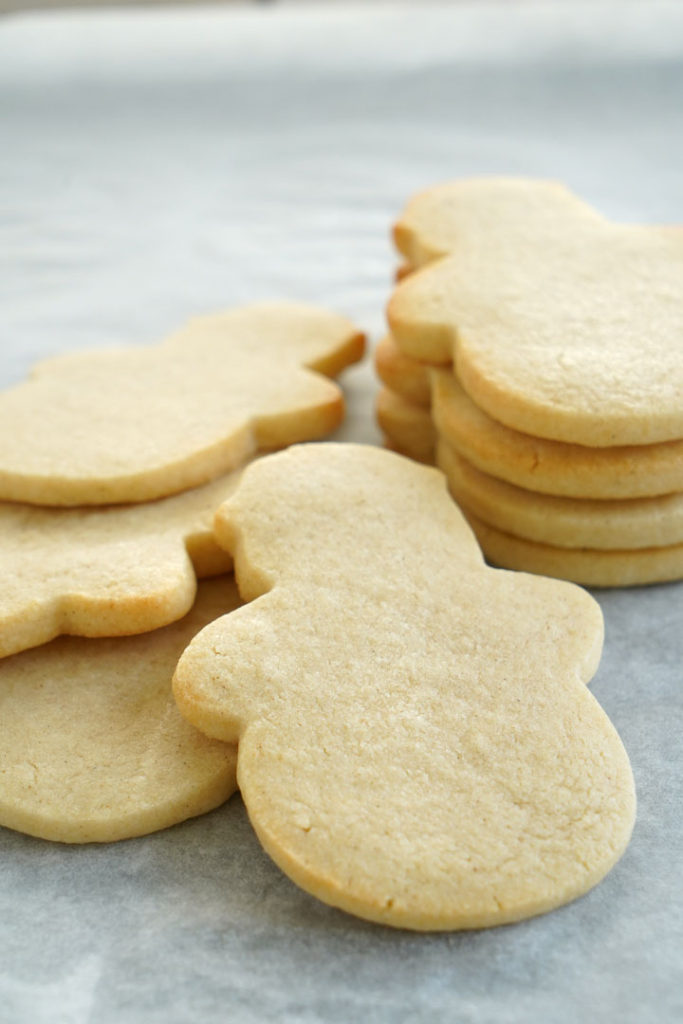
The most important thing is for the cookies to hold their shape when baked. I have a ton of tips included with my sugar cookie recipe on how to do this but the one key tip is to make sure your dough is chilled before cutting and before baking.
Besides your baked cookies, you will need a batch of cookie icing, food dye gel color (for the scarf color), white sparkling sugar crystals, and orange sprinkles.
I have plenty more details and tips on making the dough and the icing in the respective post links given above so be sure to read through them first!
Preparing the Icing
Prepare your colored icings according to your cookie icing recipe and have them ready in piping bags. I used 12 inch piping bags fitted with a number 2 tip for details (black and scarf color icing) and a 16 inch piping bag with a number 4 tip for flooding (white icing).
If you don't have plastic bags and tips, you can also make a DIY piping bag for icing out of parchment paper!

How to Decorate Snowman Cookies
Step 1: Set up your workspace
Clear your counter space and lay out your cookies on a large sheet pan or on a piece of parchment paper. Leave a small workspace in front of you to work on each cookie.
Step 2: Pipe the hats
Outline and then fill in the snowman hat with your black icing. As you do each hat on each cookie, lay the cookie on a big sheet pan to dry while you work on the rest. Do ALL the hats on ALL the cookies at once.
Step 3: Pipe the snowman bodies
Outline and fill in the snowman body with plain or white icing. Lay each cookie back on the sheet pan to dry. Do all the bodies on all the cookies at once.
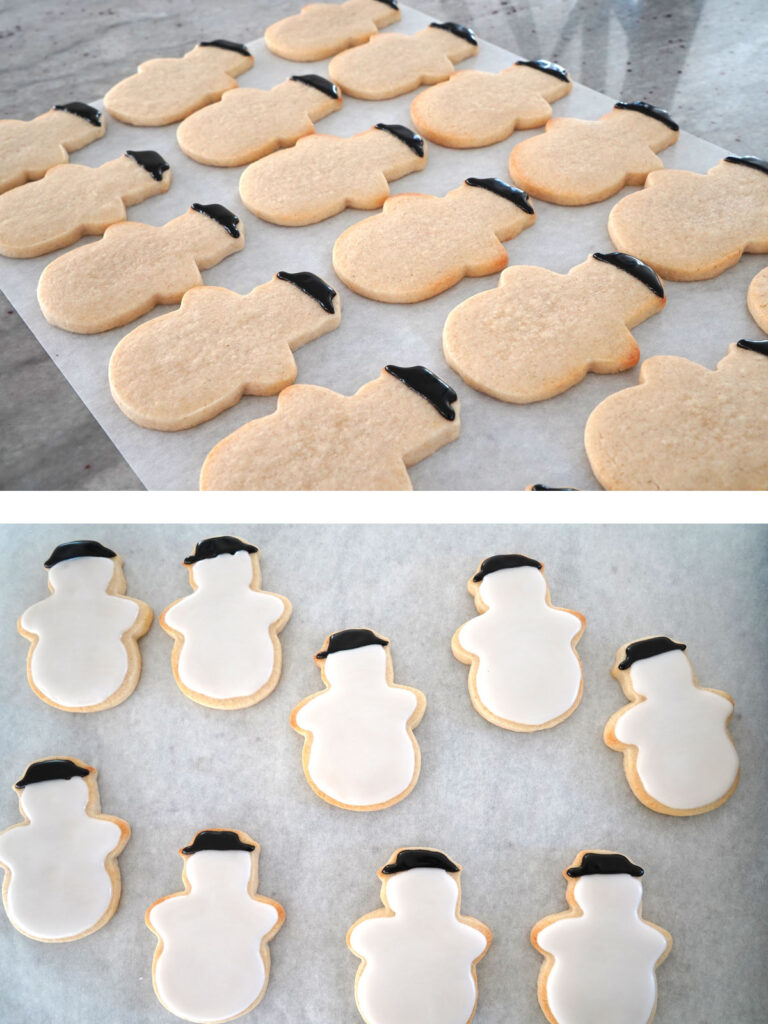
Step 4: Add the scarf
Go back to the first cookie from step 3. It should be dry enough to draw the scarf with your choice of colored icing. Draw a thick line across the neck by going over it twice with your icing.
Then draw a long line and short line for the hanging part of the scarf the same way. Immediately sprinkle with sparkling sugar and shake off the excess. Repeat for all the cookies.
Step 5: Add the nose
Add a small dab of white icing with your piping bag to one orange sprinkle and stick it in the center of the face. Repeat for all cookies.
Step 6: Pipe the eyes and buttons
Using the black icing and small tip, add the snowman's eyes and buttons to all the cookies. (I find that if I repeat all the eyes first and then go back and do all the buttons, I pipe with more consistency.)

Tips for Decorating Sugar Cookies
- Work on each "section" of your cookie all at once. For example, do all the snowman hats on ALL the cookies before doing the white part of the main body. The repetition will actually help to improve your technique.
- I use two hands when piping. One hand to squeeze and the other to steady the other hand. (See video where I am piping the hat!)
- Have a few clean toothpicks nearby. You can sometimes use toothpicks to gently move icing around when there are gaps in the icing or when you make small mistakes.
- You do not have to wait too long for the body to dry in order to pipe the scarf. The surface should look matte not shiny. Usually by the time I am done filling all the bodies, the first cookie that I did is ready to be piped on.
- You can keep reusing the sugar crystals that you shake off each cookie.
- Keep any extra icing that is not in your piping bag covered with a wet paper towel to keep it from drying out.
- Arrange all of your cookies on a large piece of parchment or on a cookie sheet to dry.
Natural Food Coloring for Snowman Cookies
All of the coloring I use on my snowman cookies is natural! You can use regular food dye gels but I do want to explain how I avoided chemical food dyes.
I used a green natural food dye made by Chefmaster to use for the scarf. The nose is made with naturally orange colored sprinkles made by Whole Food's 365 brand.
Black Icing Without Food Dye
The black icing used for the eyes, buttons and hat was made by adding black cocoa powder to the cookie icing. "Black" cocoa powder is different from regular unsweetened cocoa powder and is super dark and super rich in flavor. (It is also what I use to make black colored buttercream.) It does give it a bit of a chocolate taste which is just fine with me!

Cookie Icing vs. Royal Icing for Snowman Cookies
I decorate these snowman cookies with my easy cookie icing instead of a classic royal icing. Royal icing is made with egg whites or meringue powder, which is what makes it dry rock hard. That's great for gingerbread houses, but I don't like biting into icing that hard on a cookie.
My cookie icing is just confectioners' sugar and milk. It dries firm to the touch so you can stack and pack the cookies, but it stays soft when you bite into it. The one trade-off is drying time. Give the finished cookies a full night uncovered before you store them, and a little longer if you used a lot of gel color.
If you already have a royal icing recipe you love, it will work for this design too. Just thin it to a medium consistency for the outlines and details.
Make Ahead, Drying and Storage
Snowman cookies are a good make ahead project because every stage can be done in advance.
Rolled out dough keeps in the refrigerator for up to 3 days or in the freezer for up to 3 months. Baked, undecorated cookies keep about a week in an airtight container, or up to 2 months in the freezer. Decorate after thawing.
Once decorated, let the cookies dry uncovered overnight so the icing sets firmly enough to stack. Then store them in an airtight container between layers of parchment for 3 to 5 days, or freeze fully dried decorated cookies in single layers for up to 3 months and thaw at room temperature.
More Easy Snowman Cookie Ideas
If you want a snowman that's even easier to decorate, try my melted snowman cookies. No outlining, no steady hand required, and a marshmallow does most of the work.
For a festive platter, arrange the snowman cookies with chocolate peppermint snowflake cookies.
Where to Find Materials and Ingredients
- Snowman Cookie Cutter Any cookie cutter with a similar shape will do but this is the one that I used.
- Black Cocoa Powder I use King Arthur Flour brand. I have not tried others but I would expect similar results as long as it is labeled "black" cocoa powder.
- Orange Sprinkles If you can't find a bottle of natural sprinkles that are just orange, just by the mixed colors and pick out the orange ones.
- Natural Food Dyes In addition to Chefmaster, many other brands such as India Tree, 365, and McKormick also make plant based dyes.
- White Sparkling Sugar I used Wilton Sparkling Sugar. You can find many of their products at craft stores.

Snowman Sugar Cookies
Cut out snowman sugar cookies decorated with a simple two-ingredient cookie icing instead of royal icing. Sparkling sugar scarves, a sprinkle nose, and black icing made with black cocoa rather than dye. Step by step decorating with video. Makes 24.
Ingredients
Sugar cookie dough
- 3 cups all purpose flour (390g)
- 2 teaspoons baking powder
- ½ teaspoon salt
- ¼ teaspoon each cinnamon, cardamom, nutmeg (optional)
- 1 cup unsalted butter, cold and cubed (224g)
- 1 cup sugar (200g)
- 1 egg
- 1 teaspoon vanilla extract
Cookie icing
- 2 cups confectioners' sugar
- 3-4 tablespoons milk or water
- 1 teaspoon black cocoa powder (for the black icing)
- gel food coloring for the scarf
Decorating
- white sparkling sugar
- orange sprinkles
Instructions
- Whisk the flour, baking powder, salt and optional spices in a large bowl. Set aside.
- In a food processor, process the cold butter and sugar until well combined, scraping down the sides once. Add the egg and vanilla and process until just combined. Add the flour mixture and pulse until the dough just comes together. If it stays crumbly, turn it out and finish by hand.
- Divide the dough in half. Roll each half to ¼ inch thick between sheets of parchment. Chill for 30 minutes in the refrigerator or 15 in the freezer.
- Cut out snowmen and bake at 350°F for 7 to 10 minutes, until the edges are just golden. Cool completely.
- Make the icing. Stir the confectioners' sugar with milk added a teaspoon at a time until you have a medium consistency. Set aside about ½ cup for the black icing and stir in 1 teaspoon black cocoa powder. Tint another ½ cup with gel color for the scarves. Leave the rest white.
- Fill the 16 inch bag (#4 tip) with white icing and the two 12 inch bags (#2 tips) with black and scarf color.
- Lay the cookies out on parchment or sheet pans. Outline and fill the hat on every cookie with black icing.
- Outline and fill the body on every cookie with white icing. By the time you finish the last one, the first should be matte and ready for the scarf.
- Pipe the scarf across the neck, going over the line twice, then a long and a short line for the hanging ends. Sprinkle with sparkling sugar right away and shake off the excess.
- Dab white icing on an orange sprinkle and set it in the center of the face for the nose.
- Pipe the eyes on every cookie with black icing, then go back and add three buttons to each.
- Let dry uncovered overnight.
Notes
EQUIPMENT NEEDED: snowman cookie cutter, two 12 inch piping bags with #2 tips, one 16 inch piping bag with #4 tip, toothpicks, parchment or sheet pans.
YIELD and TIME: If using my rolled sugar cookie dough recipe, you should be able to make about 24 snowman cookies. The time listed in this recipe is an estimate and depends on how quickly you are able to pipe icing.
DRYING: Let them dry in the open overnight.
FREEZING: You can freeze completely dry iced cookies by laying them in single layers in airtight containers. (For up to 3 months) Thaw at room temperature.
STORAGE: Store in an airtight container for 3-5 days.



Leave a Reply